Advertise on TechCreak.com

How to create your custom Google Plus Profile Button.

google plus icon

In spite of the other Social Networking websites, the Google+ is slowly gaining momentum. Day by day Google+ is gaining popularity. More and more users are joining the Google+.


If you are running any blog or website, then it is very important that visitors can follow you on Google+ like other social networking websites. You should place a Google+ Profile button to your blog or website where from visitors can follow you.

google  icon

You can place your own customized Google+ profile button to your blog or website with the help of the steps given below:-


Firstly sign in to your Google Plus account.


Then copy the Text given in the address bar as shown in given image up to the long number given.


google bar


Now Go to Google Profile Button Page.


profile page1


Paste the text copied from the address bar in the last step.


Select the size of you custom Google+ profile icon. You can check the preview of your Google+ profile button.


Next copy the HTML code generated which can be pasted where you  want to place your customized Google plus profile Button.


code


In these simple steps you can add your customized Google plus Profile button to your blog or website.


How to remove the Blogger Bar or Navigation Bar in Blogspot.

The Blogger Bar or navigation Bar in Blogspot has many utilities like Google search, Follow, Share, and also somebody can go to the random Next Blog.

navbar

You can select different styles for the Navigation bar by going to

Design >> Page Elements and as shown in image:-

nav1

But if you still want to remove or hide Blogger Bar or Navigation Bar,

Go to Design >> Edit HTML


design

Now search for the code by pressing Ctrl+F    <b:skin><![CDATA[

Just after this code, Paste the following code 


#navbar-iframe { height:0px; visibility:hidden; display:none; }


If this still does not work Try this one code:-


#navbar-iframe {
    display: none !important;
}


Finally click on the Save Template.

Now the Navbar or Blogger Bar will not be visible.


How to add Back to Top button widget to blogger.

Back to top icon is a link on any website or blog which sends the viewer to the top of that web page. Besides this, it adds a good look to your blog or website. It is very simple to add back to top button widget to blogger.
For this purpose, the following simple steps are given below:- 
  • Firstly you should have two arrows images, one small and one bigger.
  • We are giving two type of images given below. Just right click on the images and Click on Save image As to your computer.


  • Upload these arrow images from your computer to Photobucket or any other service.
  • Now go to Blogger > Design > Page Elements > Add a gadget > and add a HTML/JavaScript gadget
  • Now copy the following code and paste in this newly added gadget. 
 
;
  • Replace the text given in capital letters with the link address where the bigger and smaller images are uploaded as indicated in the code. 
  •  Keep the title of HTML/JavaScript gadget blank and click OK.
  • Place this  gadget at lower side of your blog anywhere.
      Save the changes and you will see a beautiful Back to Top botton in your blog.


How to Restore Run command on the Start Menu.


Normally in Windows 7, The Run command is not displayed on the Start Menu as in the previous versions the Windows. The Search Box appearing on the start menu performs same function like the Run command. Also the Run command can be accessed by pressing Windows key + R.

However the Run command still can be restored on the Start menu with the simple steps given below:-
To restore the Run command to the Start Menu. 
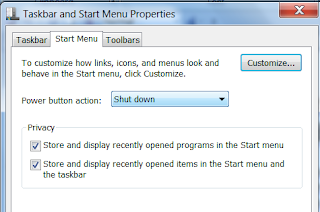
  • Right click on the Start Menu.
  • Select Properties>  Start Menu tab > Customize 

  •  Just check the Run command-ON option.

  •  Press OK > Apply > OK
 The Run command will be placed on the Start Menu.


How to Enable or Disable Task Manager in Windows 7.

Task Manager plays a major role in computers. It helps to run the system properly and efficiently. Due to its importance, the following steps are given to enable or disable the Task Manager in the Windows 7.
Steps:-
1. Go to Start button and type regedit in the search box.

     
2. Now click on the regedit given under the programs.
3. Click on Yes in new opened window.
4. Now follow the given  steps
    HKEY_CURRENT_USER > Software > Microsoft > Windows > Current Version > Policies > System.  

          
5. Right click on System. Select New >  32-bit DWORD value


 6. Search for   DisableTaskMgr. if it is not found, create a new  32-bit DWORD value having name as  DisableTaskMgr.
7. Double click on   DisableTaskMgr to put its value.

 8. Put value data as 1 to disable the Task Manager and 0 to enable the Task Manager.

In this way you can disable or enable the Task Manager in Windows 7.
If you enjoyed this tutorial don't forgot to share it with your friends. 


How to remove or show the Recycle Bin from the desktop.


The Recycle Bin icon normally appears on the Desktop. It has many advantages as well as disadvantages. For example:-The advantage is that you can easily recover accidentally last deleted files. The disadvantage is that somebody can access or recover the deleted files by you which you don't want to show anybody from here. You cannot delete the Recycle Bin icon from the desktop directly. In spite of these facts, you can remove or show Recycle Bin from desktop in Windows 7 with the help of simple tutorial given below:-

Important Note: - it is to be noted that even the Recycle Bin is hidden, the deleted files are still stored there until you delete them permanently or recover. 
  • Click on Start icon in left corner. Type the text “Desktop icons” into search box. 
     
  • Click on Show or hide common icons on the desktop.
  • The Desktop icon settings dialog box will open. Take the following steps as per your choice:
 
  • To hide the Recycle Bin, un check the Recycle Bin check box given in the dialog box.
  • To show the Recycle Bin, check the Recycle Bin check box.
  • Finally click OK.

Similarly you can apply this tutorial for Computer, Network and Control Panel icons on the desktop. The same tutorial can also be applicable for Windows XP with some slightly different steps.

So enjoy this post.


JOIN US AND GET LATEST UPDATES

Get Updates via Email
 
Home | About | Privacy | Proudly Powered By Blogger. | Blogger Template Design By Techcreak Go To Top