Advertise on TechCreak.com

How to create your custom Google Plus Profile Button.

google plus icon

In spite of the other Social Networking websites, the Google+ is slowly gaining momentum. Day by day Google+ is gaining popularity. More and more users are joining the Google+.


If you are running any blog or website, then it is very important that visitors can follow you on Google+ like other social networking websites. You should place a Google+ Profile button to your blog or website where from visitors can follow you.

google  icon

You can place your own customized Google+ profile button to your blog or website with the help of the steps given below:-


Firstly sign in to your Google Plus account.


Then copy the Text given in the address bar as shown in given image up to the long number given.


google bar


Now Go to Google Profile Button Page.


profile page1


Paste the text copied from the address bar in the last step.


Select the size of you custom Google+ profile icon. You can check the preview of your Google+ profile button.


Next copy the HTML code generated which can be pasted where you  want to place your customized Google plus profile Button.


code


In these simple steps you can add your customized Google plus Profile button to your blog or website.


How to remove the Blogger Bar or Navigation Bar in Blogspot.

The Blogger Bar or navigation Bar in Blogspot has many utilities like Google search, Follow, Share, and also somebody can go to the random Next Blog.

navbar

You can select different styles for the Navigation bar by going to

Design >> Page Elements and as shown in image:-

nav1

But if you still want to remove or hide Blogger Bar or Navigation Bar,

Go to Design >> Edit HTML


design

Now search for the code by pressing Ctrl+F    <b:skin><![CDATA[

Just after this code, Paste the following code 


#navbar-iframe { height:0px; visibility:hidden; display:none; }


If this still does not work Try this one code:-


#navbar-iframe {
    display: none !important;
}


Finally click on the Save Template.

Now the Navbar or Blogger Bar will not be visible.


How to add Back to Top button widget to blogger.

Back to top icon is a link on any website or blog which sends the viewer to the top of that web page. Besides this, it adds a good look to your blog or website. It is very simple to add back to top button widget to blogger.
For this purpose, the following simple steps are given below:- 
  • Firstly you should have two arrows images, one small and one bigger.
  • We are giving two type of images given below. Just right click on the images and Click on Save image As to your computer.


  • Upload these arrow images from your computer to Photobucket or any other service.
  • Now go to Blogger > Design > Page Elements > Add a gadget > and add a HTML/JavaScript gadget
  • Now copy the following code and paste in this newly added gadget. 
 
;
  • Replace the text given in capital letters with the link address where the bigger and smaller images are uploaded as indicated in the code. 
  •  Keep the title of HTML/JavaScript gadget blank and click OK.
  • Place this  gadget at lower side of your blog anywhere.
      Save the changes and you will see a beautiful Back to Top botton in your blog.


How to Restore Run command on the Start Menu.


Normally in Windows 7, The Run command is not displayed on the Start Menu as in the previous versions the Windows. The Search Box appearing on the start menu performs same function like the Run command. Also the Run command can be accessed by pressing Windows key + R.

However the Run command still can be restored on the Start menu with the simple steps given below:-
To restore the Run command to the Start Menu. 
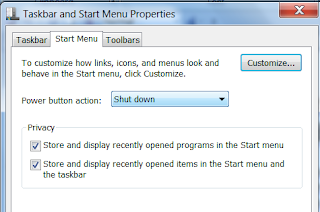
  • Right click on the Start Menu.
  • Select Properties>  Start Menu tab > Customize 

  •  Just check the Run command-ON option.

  •  Press OK > Apply > OK
 The Run command will be placed on the Start Menu.


How to Enable or Disable Task Manager in Windows 7.

Task Manager plays a major role in computers. It helps to run the system properly and efficiently. Due to its importance, the following steps are given to enable or disable the Task Manager in the Windows 7.
Steps:-
1. Go to Start button and type regedit in the search box.

     
2. Now click on the regedit given under the programs.
3. Click on Yes in new opened window.
4. Now follow the given  steps
    HKEY_CURRENT_USER > Software > Microsoft > Windows > Current Version > Policies > System.  

          
5. Right click on System. Select New >  32-bit DWORD value


 6. Search for   DisableTaskMgr. if it is not found, create a new  32-bit DWORD value having name as  DisableTaskMgr.
7. Double click on   DisableTaskMgr to put its value.

 8. Put value data as 1 to disable the Task Manager and 0 to enable the Task Manager.

In this way you can disable or enable the Task Manager in Windows 7.
If you enjoyed this tutorial don't forgot to share it with your friends. 


How to remove or show the Recycle Bin from the desktop.


The Recycle Bin icon normally appears on the Desktop. It has many advantages as well as disadvantages. For example:-The advantage is that you can easily recover accidentally last deleted files. The disadvantage is that somebody can access or recover the deleted files by you which you don't want to show anybody from here. You cannot delete the Recycle Bin icon from the desktop directly. In spite of these facts, you can remove or show Recycle Bin from desktop in Windows 7 with the help of simple tutorial given below:-

Important Note: - it is to be noted that even the Recycle Bin is hidden, the deleted files are still stored there until you delete them permanently or recover. 
  • Click on Start icon in left corner. Type the text “Desktop icons” into search box. 
     
  • Click on Show or hide common icons on the desktop.
  • The Desktop icon settings dialog box will open. Take the following steps as per your choice:
 
  • To hide the Recycle Bin, un check the Recycle Bin check box given in the dialog box.
  • To show the Recycle Bin, check the Recycle Bin check box.
  • Finally click OK.

Similarly you can apply this tutorial for Computer, Network and Control Panel icons on the desktop. The same tutorial can also be applicable for Windows XP with some slightly different steps.

So enjoy this post.


How to add floating social media widget to blogger.


In the present time, the social bookmarking websites like Facebook, Google +1, Digg, Twitter, StumbleUpon play a major roll on the internet. These websites has a huge number of visitors daily. If you put sharing buttons for these websites on your website, they can drive much traffic to your website. Also your website will be more popular on these social networking websites as well as on the internet.
 In the following tutorial, you will learn to add these floating social media buttons to your blogger in the given simple steps:- 
Firstly you should disable share buttons for the “Blog Posts” widgets enabled by default. If you do not disable this option, the Google +1 button will not work properly.
1. Go to Dashboard > Design > Edit HTML. and search for <head> tag and Paste the following code just below it and Save the template.

<script src='http://apis.google.com/js/plusone.js' type='text/javascript'> {lang: &#39;en-US&#39;} </script>


2. Go to Design > Page elements
3. Add a gadget, Select HTML/Java Script gadget.
4. Now leave the “Title” blank and drag this Gadget to the left sidebar.
5. Copy the following code and paste inside this gadget in content box.


<style>#floatingbuttons{background:#F9F9F9;background:-webkit-gradient(linear, left top, left bottom, color-stop(0, #fff), color-stop(1, #F9F9F9));background:-moz-linear-gradient(top, #fff, #F9F9F9);border:1px solid #ccc;float:left;padding:0 0 3px 0;position:fixed;bottom:15%;left:0;z-index:10;border-radius:0 5px 5px 0;box-shadow:2px 2px 5px rgba(0,0,0,0.3);} #floatingbuttons .floatbutton{float:left;clear:both;margin:5px 4px 0 4px;} .addbuttons{clear:both;text-align:center;padding-top:5px;} .addbuttons a span.getfloat, .addbuttons a span.sharebuttons{color:#000;background:none;font-family:arial, sans-serif;display:block;font-size:9px;font-weight:bold;text-decoration:none;line-height:11px;} .addbuttons a:hover span{color:#fff;background:none;text-decoration:underline;}</style>
<div id='floatingbuttons' title="Share this post!"><script src="http://connect.facebook.net/en_US/all.js#xfbml=1"></script><script type="text/javascript"> (function() { var s = document.createElement('SCRIPT'), s1 = document.getElementsByTagName('SCRIPT')[0]; s.type = 'text/javascript'; s.async = true; s.src = 'http://widgets.digg.com/buttons.js'; s1.parentNode.insertBefore(s, s1); })(); </script><!-- Medium Button --><script src='http://platform.twitter.com/widgets.js' type="text/javascript"></script>

<div class='floatbutton' id='google+1'><g:plusone size="tall"></g:plusone></div>
<div class='floatbutton' id='facebook'><fb:like layout="box_count" show_faces="false" font=""></fb:like></div>

<div class='floatbutton' id='digg'><a class="DiggThisButton DiggMedium"></a></div>
<div class='floatbutton' id='stumbleupon'><script src="http://www.stumbleupon.com/hostedbadge.php?s=5"></script></div>

<div class='floatbutton' id='twitter'><a href="http://twitter.com/share" class="twitter-share-button" data-count="vertical" >Tweet</a></div>

<div class="addbuttons"><a href="http://www.hints-and-tricks.com/2011/11/how-to-add-floating-social-media-widget.html " title="How to add floating social media widget to blogger. "><span class="getfloat">Get buttons</span></a> </div> </div>


6. Click on Save. The social media floating widget has been installed on your blogger.
You can see example of this widget on left hand side of this blog.


How to take screenshot without any software installation in Windows.


Earlier if someone wanted to take screenshot in windows, he had to use the Print Screen option and paste the screenshot in any image editor for making the changes in that screenshot. Besides this, there are many softwares available on the internet for taking the screenshots or for screen-capturing. These softwares either they can be purchased or they come with trail period. After expiring their trail period, they becomes useless. At this time you have to download another one screen capturing software.
But the good news is that the Window 7, Window Vista and some latest Editions of Window XP has  inbuilt screen-capturing software called Snipping Tool. So What is the snipping tool?  The snipping Tool is a very handy and useful screen capturing utility. Snipping Tool can take screenshots of currently opened window, a rectangular area, entire screen or a freely selected area. Also Snipping tool can save the captured screenshots in PNG, GIF, or JPEG formats. You can edit the captured screenshot and send the captured screenshot by email. Also you can highlight any part of screenshot. The snipping tool has also many other useful options available. 

For opening Snipping Tool

Go to Programs > Accessories you will find snipping tool in this folder

You can also find this tool by typing Snipping tool in the search box.

So enjoy this very handy and simple utility.


How to lock a folder without any software in Window XP or Window 7.

If you can lock a folder without installing any software, then there is no need to buy costly software to lock the folders in window XP or window 7. Here is very simple trick to Lock any folder without any software in window XP or window 7. The simple steps are given below:- 

1.Open Notepad in your computer.  

2.Copy the code given below and paste it in the Notepad opened.
    cls
    @ECHO OFF
    title Folder Locker
    if EXIST "Control Panel.{21EC2020-3AEA-1069-A2DD-08002B30309D}" goto UNLOCK
    if NOT EXIST Locker goto MDLOCKER
    :CONFIRM
    echo Are you sure u want to Lock the folder(Y/N)
    set/p "cho=>"
    if %cho%==Y goto LOCK
    if %cho%==y goto LOCK
    if %cho%==n goto END
    if %cho%==N goto END
    echo Invalid choice.
    goto CONFIRM
    :LOCK
    ren Locker "Control Panel.{21EC2020-3AEA-1069-A2DD-08002B30309D}"
    attrib +h +s "Control Panel.{21EC2020-3AEA-1069-A2DD-08002B30309D}"
    echo Folder locked
    goto End
    :UNLOCK
    echo Enter password to Unlock folder
    set/p "pass=>"
    if NOT %pass%==PUT YOUR PASSWORD HERE goto FAIL
    attrib -h -s "Control Panel.{21EC2020-3AEA-1069-A2DD-08002B30309D}"
    ren "Control Panel.{21EC2020-3AEA-1069-A2DD-08002B30309D}" Locker
    echo Folder Unlocked successfully
    goto End
    :FAIL
    echo Invalid password
    goto end
    :MDLOCKER
    md Locker
    echo Locker created successfully
    goto End
    :End
    3. Replace “PUT YOUR PASSWORD HERE” text given in red color above code with password of your choice.  

    4. Now the save this file as a .bat file having any name e.g. xyz.bat  

    5. Try to save this file having name like the system files. And place this .bat file in the system folders. So that everybody will think, this file is a system file.  

    6. Now close this .bat file. Double click on this .bat file, It will create a new folder called “Locker” automatically in the same directory as the .bat file created earlier.  

    7. Now place the contents you want to hide or lock inside this Locker folder. And double click on .bat file. System will ask you “Are you sure u want to lock the folder”. Type Y and press Enter.  

    8. The folder will be locked.  

    9. To open this folder just double click the .bat file, the system will ask to enter the password. Just enter your password and Press Enter. The folder will be unlocked.  

    10. So this is very simple trick to hide or lock the files in window XP or window 7. Just you have to be careful that nobody can access the .bat file generated and can know your password.
      Enjoy this Trick.


      How to block or enable cookies in Internet Explorer for specific website.

      When you browse or surf any website, they collect the information about your browser type, your IP address, operating system and the web pages you are visiting etc. This all information is transmitted by your browser. Which is very useful for finding your activities and habits. For this purpose, the websites you visit send a piece of data which contains a unique identification code which is stored on your web browser, Which can be read back from that web browser. This piece of data is called cookies. Although these cookies are very beneficial for above said purposes but they can also be used to hack your important private information or passwords.

      Most of the user thinks, it is always safe to block cookies in your internet browser. But for browsing some websites, the cookies acceptance should be enabled. To make an exception or change settings for cookie acceptance in browser, you can change Internet Explore settings to enable or block specific cookies. For this purpose the following steps are given:-

      1.     Go to Tools and then Internet options in Internet Explorer.
      2.   Click on Privacy tab. Adjust slider given under the settings to Medium. At this level the cookies from trusted sites are always accepted and are blocked from suspicious websites
      3.   Press Advanced tab. And check the override automatic cookie handling. Also check First party cookies and third party cookies both as Accept. Also check the Always allows session cookies option to accept the cookies especially to browse financial institutions websites. Besides this if you want to notify you about your choice to accept cookies, you can also select Prompt option also.
      4.     Press OK

      If you want to enable or disable cookies for certain websites, you can create Block or Allow list.

      1.      Go to Internet options in  your Internet explorer.
      2.      Click Tools> Privacy> Sites.
      3.      Put the URL or website, whose cookies you want to be block or allow. And click on Block or Allow as per your choice.
      4.      Press OK, You can add or delete any website from this list to accept the cookies.


      How to Type New Indian Rupee Symbol in Windows XP or Windows 7 without any Font Installation.

      Finally Indian Rupee has got its own symbol like other international currencies. By default, anybody can not type the new Indian rupee symbol like other special characters. Also it will take some time to get the Key position on keyboards like other symbols. Generally,  you have to install new font for typing  Indian Rupee Symbol from somewhere. But I will explain a tutorial to create your own font for typing this symbol as follow:-

      1.       Press windows key along with R.
      2.       Type C:\WINDOWS\system32\eudcedit.exe  in Run and hit enter.
      3.       The “Private Character Editor” will be opened. Press OK in the “Select Code” window  opened along with this Editor.
      4.       Go to Tools in the “Private Character Editor”  and Item and then Pencil option.
      5.       Draw the Indian rupee symbol with the help of pencil.
      6.       Now go to File>Exit, The system will ask to save this character click Yes.
      7.       Save the character to all the fonts shown or any specific font family.
      8.       Now go to Start>Accessories> System Tools> Charactre Map option.
      9.       The new Indian Rupee symbol can be found in the famil where it was saved.
      10.   Now just copy the character and paste it where required. And Enjoy this trick.


      How to change Shutdown and Startup sound in Windows 7, Window XP or Vista.

      Hello Friends! If you are bored due to the sounds of window during the startup and shutdown, then there is a good news for you. You can change the startup and shutdown sounds in windows 7, windows XP and Vista. You can use any track of your choice instead of these sounds provided you have track of your choice in  .WAV format. For this purpose the following steps are given:-

      1.       Firstly decide the Track which you want to use during the Shutdown and Startup.
      2.       This track should be in .WAV format as well as having size less than 1Mb. If the size of this file is greater than this the window will take some more time during the startup and shutdown.
      3.       Now name this track as “Windows XP Startup.WAV” and “Windows XP Shutdown.WAV
      4.       Now go to the C drive>WINDOWS>MEDIA. Here you will see two files having names  “Windows XP Startup.WAV” and “Windows XP Shutdown.WAV”. Replace these files with the files selected by you respectively.
      5.       Now all the steps are completed and you can enjoy new startup and shutdown sounds.


      How to Update Facebook Fan Pages automatically using RSS feed.

      Facebook logo 
      In the present time, the role of Facebook cannot be ignored in promoting any product, a website or blog. If you have a website, organization or runs any business, You can make Facebook Fan Pages to promote your product on the Facebook. Generally the website or blog is made for promoting any product online and Administrator of the website or blog used to provide the updates about the product on his website or blog. Besides this, the Facebook Fan Page should also be updated accordingly. For this purpose, you can Update Facebook fan page automatically with the RSS feeds of your website or blog explained as below:-

      • Go to your Facebook account.
      • Click on the dropdown arrow next to “Account”.
      • Select the option “Use Facebook as Page”.
      • Click the “Switch” button given in the next instruction.
      • Click on the “Edit Page “option given at the top-right of the page.
      • Click on “Apps” in left sidebar and click the link “Go to Application” under Notes.
      • Click on “Edit import settings” given in the left sidebar.
      • Put your Blog RSS feed address in the web URL box. Confirm this action and follow the instructions given ahead.
      • Now click “Start importing” and Facebook validate your feed URL. In this way all the process is completed.


      How to use windows Hidden Bluetooth suite.

      Hello friends, Today I have noticed a very interesting hidden trick for Windows XP, vista or Windows 7. This trick will not work only for vistax86 sp2. In all the other windows editions you can use the windows inbuilt hidden Bluetooth suite to send or receive data. Their is no need to install any software for your usb Bluetooth provided you have necessary Bluetooth hardware. For using this hidden bluetooth the following steps are given:-

      • Go to start >> Run or press windows key along with R.
      • Type CMD in Run.
      • Type fsquirt in CMD.
      That is done. Now you can transfer any data without using or installing any software.
      I hope you will like this nice trick.


      How to Undo any sent mail in Gmail account.

                           Sometimes, After sending a Email we relies that the Email should not be sent and we want to undo that Email sending. To encounter this problem Gmail has introduced a new feature called "Undo send". If you enable this feature in your Gmail account you can set a buffer time for which every Email is kept in the draft. Within that buffer period you can undo sending of Email.For enabling this feature the following steps are given:-
         Sign in to your Gmail account .

         Click on the setting>Labs

         Enable "Undo send" option.

         Click save changes option

         Now go to the General Tab under the setting and set the cancellation period to undo any Email sending. For this time period, the Email will be stored in the draft and after this time period the Email will be automatically sent if you don't undo that sending.
                                                      Now every time when you send a Email you will see the message like this "Your message has been sent. Undo "


          Change background image in Google search with your own image.

          Google provides you the power to place your own image as background image in Google search engine. As we have seen in Bing search engine someone can also place any image as a background in Google search engine. Every time when you will be logged in, The background image will be shown as background in the Google search engine.  For this purpose the following steps are given:-
          • Log-in to your Google account.
          • Open Google search.
          • Click on change background given at the left or right bottom.
          • Upload or browse the gallery for the image  which you want to set as background.
          And the Image will be placed as background. 


          How to know who used your PC in your absence.

          The following steps are given to know who used your PC in your absence: - 

          For Windows XP

          • Go to start > run or by pressing window key along with R
          • Type eventvwr.msc in run
          • You will see three type of log files i.e. Application, Security, and system. These log files can be accessed at any time.
          • For above said purpose, We just have to analyze System log only.
          • Click on System for the list of the events.
          • Find the time and date when you were not at home and your PC should not be ON.
          • Double click on any event to view its details.
          So you can know the time for which your PC was ON.

          For Windows 7

          • Go to start > run or press window key along with R
          • Type eventvwr.msc and hit enter.
          • Double click on Windows logs
          • Double click on System logs
          • You will see different logs files having different time at which they happened. You can also see the details about any event.
          So you can find all the system logs when your PC was ON. And you can find whether your PC was turned on in your absence.


          How to Email a URL of a web page only using the browser.

          Here is a very simple trick to send a web page link or URL to any email address by using only browser. You don’t have to use any web service. Just type mailto:email address of the receiver   for example: - mailto:psjallah1@gmail.com This will compose a new message in default email settings done on your PC. You can send the URL in the body of the message or the subject of the message


          How to bookmark or share a web page directly with browser.

          Generally, when somebody is browsing the internet and he notices a very interesting topic or a web page. For bookmarking or sharing of that web page for future reference, He bookmarks or shares that web page by going to the respective social bookmarking or sharing website.

          But for the same purpose, there is web service from which you can directly bookmark, share or Email that web page without visiting to the social bookmarking websites. Just type smub.it/ just before the URL of the web page. For example: - smub.it/http://www.quickhow.blogspot.com/ then the entire social Social bookmarking websites, sharing and email links will be provided to you.You just have to bookmark that web page with required social bookmarking, sharing or Email service.

          So enjoy very easy bookmarking.


          How to disable right click on computer or Laptop

          Sometimes, You want to disable right click on your computer or laptop so that the settings associated with right click cannot be changed by some unknown person.
           
          For disabling the right click on computer or laptop, the following steps are given: -
          •  Log in to your computer with administrative account.
          •  Click Start or press R alongwith window key.
          • Type regedit in it.
          •  Find HKEY_CURRENT_USER >Software >Microsoft >Windows >CurrentVersion >PoliciesExplorer
          • Right click on right sidebar panel, creat a new DWORD value right clicking and name it   
          • NoViewContextMenu (Case sensitive)
          • Assign number1 in value data box.
          • Now close registry editor.
          • Restart your computer or laptop.
          You will notice that the right click has been disabled in your computer or laptop. So enjoy this trick.


          How to covert online PDF document into other file formats.


          There is absolutely free web service to convert online a PDF file to any other type of file like excel, doc, rtf, ppt etc.  Called Zamzar.
          Just you have to website  

          Select file or put the URL of the file.
          Choose to format of the required file.
          Put your Email address.
          Your file will be converted.


          How to convert online a web page directly into a PDF file.


          Hello friends, it is a habit to save a web page as a HTML file and then to convert it to any other file format like PDF etc. But ii is very time consuming process.
          Fortunately, there is a free web service called PrimoPDF service at which you can convert any web page to PDF format. Just you have to go to PrimoPDF and put URL of that page. The PDF file generated from that Web page will be emailed to Email address provided by you absolutely free. Also you can download free PDF converter from this web service.

          So enjoy this free web service.


          How to change Taskbar Button width in Window XP.

                      Sometimes when you have opened to many applications on your computer having Window XP, the taskbar becomes very crowded. You have to minimize too many applications. By default the window makes the group of similar applications. To avoid this, you can change the width of each taskbar buttons of opened applications so that the only the icons are shown. In this way, so many applications can be opened at same time and it will be very easy to navigate without making any similar groups. For doings so the following steps are given:-
          •    Go to Start or Press R along with Window key.
          •    Run will be opened.
          •    Write regedit in Run.
          •    Find HKEY _CURRENT_USER\Control Panel

                        \Desktop\WindowMetrics
          •     Find REG_SZ having name Min width If you can’t find it, creat new with name Minwidth
          •     Double click on Minwidth  and adjust the number to 56
          •     Click OK
          •     Close the registry.
          •     Restart your computer.

          You will see the application icons on taskbar having small with showing only icons.


          How to enable hibernation mode in windows XP

          Hello friends, generally we are familiar with the Stand-By mode in computer. In stand-by mode, your PC remains ready for use. You can resume last state at any time by just pressing any key or power button. PC restores the information from the RAM very quickly. Also your computer remains power on in this state. 

                                     Unfortunately if he power goes out, your all valuable data or last session is lost. To avoid this situation the hibernation mode can be very helpful. Hibernation is a state of computer, when all the content of the RAM is copied to the hard disk. Hibernation state is very useful because it stores the last session of your computer when your computer went in hibernation state. In this state the information about all the opened programs and files is copied from RAM of computer to the hard disk. So you can restore the last session when you power up your computer. This mode is already enabled in most of Window 7 computers.  For enabling hibernation mode in Window XP the following steps are given:-
          1.       
          1. Firstly to enable the hibernation mode, you should be logged on as administrator or user having            the   administrator rights. Go to Start-Control panel- User accounts to check the type of your user account.
          2.   Next Start.
          3.   Control panel
          4.   Select Performance and Maintenance.
          5.   Select Power option.
          6.  Pick hibernation tab and click on enable hibernation tab.


          In this way the hibernation will be appeared in the Shut down, Restart etc. options.If Hibernate still does not appear, it is due to your computer supports the stand by low power shut down option:-

          1.       In this case press the turn off computer from start menu.
          2.       You will see three options viz. Stand by, Restart, Turn off in new window.
          3.       Now keep on pressing Shift key, The stand by options changes to Hibernation menu.

          In this you can enable the hibernation mode in your PC. If you like this trick, Please share it with your friends.


          How to know email id of any Orkut user.

          In some cases, you want to know the email id of the user who is operating the orkut account to communicate with him. By default, the email id used to operate the orkut account is not displayed in the orkut account of the user.
          Here is a very simple and interesting trick to know the email id used to login to orkut account.

          1. Login to your orkut account.
          2. Ignore the person whose email id you want to know.
          3. Now logout from your orkut account.
          4. Open your Gtalk with the same email account as used for logging to your orkut account.
          5. Go to settings in Gtalk.
          6. Next to Blocked option.
          7. Here you will see the email id of the required person.

          Enjoy this trick.


          How to send self destructive videos by email.

          Sometimes we want to send some videos to somebody, which should be shown only once to the receiver. And we want to destruct these videos just after the some views. So that these videos cannot be used further by the receiver in other ways.
          For this purpose, there is web service named mailVU which helps to send your private videos to the receiver by email. These videos sent through email message can destruct after a number of views or time fixed by the sender. These videos will work in all the major browsers or mobile phones. So this web service can be used to send your personal videos to your friends on the special occasions like birthdays, marriages and special moments etc.


          Windows XP Tips & Tricks :- How to remove blue shadow behind Desktop icons

          Sometimes the shadow behind the desktop icons looks very odd. Due to this shadow your desktop does not looks fresh. It is common problem having the shadows behind the desktop icons. Although it is very simple to remove this blue shadow yet most of computer users do not know the steps to remove this. There are following two methods for doings so:- 
          First method:-  
                 
                  1.    Go to desktop by pressing window key along with R
                  2.    Right click on desktop
                  3.    Arrange icons by >Lock web items on desktop,
                         make it unchecked> OK
                  4.    Right click on desktop
                  5.    Properties>desktop
                  6.    Click on customize
                  7.    Select web tab
                  8.    Uncheck all the options in the web page box
                  9.    Uncheck Lock desktop items
                 10.   Press OK for going to the desktop.
                 
            Second method:-
                  1. Go to control panel
                  2. System
                  3. Advanced
                  4. Performance area
                  5. Settings
                  6. Visual effects
                  7. Select “use drop shadow for icon labels on desktop” if is unchecked
                  8. Apply and finally OK
           
          If the above said two methods do not work, try this method

            Third Method: -
                  1. Go to desktop by pressing the window key along with the R
                  2. Right click on the desktop.
                  3. Select Arrange icon by.
                  4. Uncheck the option Lock web items on desktop.


          I hope this method will surely work for you to remove the shadow behind the desktop icons.
                  
          If you enjoyed this post, please subscribe to our updateds or share this post with your friends.


          How to make sketch from digital photos

          It will be very funny and interesting to create sketch from your digital photos. By doing so, you can fulfill you desires as an artist. For this purpose there is a sketch from photo software on the internet to sketch digital photos named Fotosketche software. You can create sketches of portraits, photographs of your home, beautiful landscapes, paintings, cartoons or drawings in just seconds. You can surprise your relatives or friends on the occasions of their birthdays or seasonal greetings presenting these sketches to them. You can also hang these sketches to on the walls of your home.


          Multiple facebook accounts with single email


          Hello Friends,
          It is possible to create multiple facebook accounts with single email account. If you have gmail or yahoo email account, you can use this trick.
          The fact behind this trick is that gmail and Yahoo ignores the dot (.) and plus (+) signs in the email addresses. Due to this fact the following email addresses are same for gmai or yahoo:-
          psjallah@gmail.com

          psjalla.h@gmail.com
          psjall.ah@gmail.com
          psjalla+h@gmail.com
          psjallah@yahoo.com
          psjalla+h@yahoo.com
          psj+allah@yahoo.com
          p.sjallah@yahoo.com
          In this way you can insert dot (.) or plus (+) sign in the email addresses to creat multiple facebook accounts.
          Just sign up for facebook account and provide your email id by putting above said signs in it.
          So enjoy this nice trick with your single gmail or yahoo email id to create multiple facebook accounts.


          How to remove Recycle Bin from desktop.


          When you delete any file or data from your computer, this file is moved to the Recycle Bin. Also you have to delete this file from Recycle Bin to remove it permanently. This is very time consuming process. Also sometime you delete a file which you don't want to show anybody due to some privacy issues. Unfortunately you forgot to delete this file from Recycle Bin and somebody has found this file. You feel very frustrated at this time.
          To overcome this problem you can remove Recycle Bin from desktop so that the deleted files can be deleted permanently automatically. These are the following steps to remove Recycle Bin from desktop:-
          1. Press window key together with R.
                   2. Write regedit and press enter.
                    3. Run Regedit
                   4. Go to: HKEY_LOCAL_MACHINE/ SOFTWARE/Microsoft/ Windows/CurrentVersion/ explorer/Desktop/NameSpace
                   5. Click on the "Recycle Bin" from right hand pane.
                   6. Click on delete
                   7. Press OK
                That is done the Recycle Bin will be removed from the desktop.


          Youtube Tips and Tricks :- How to load Youtube videos faster.

          Image representing YouTube as depicted in Crun...

          Generally when somebody starts to play any Youtube video on any slow internet connection, it loads lot of codes and some other settings with itself which makes this video very heavy and your favorite video take very long time to play as the page loads very slowly.

          To overcome this problem the YouTube has declared a version called Youtube Feather beta, which removes all the unnecessary options, sharing options and codes to make the page lighter. Also this version uses the advanced code to reduce page download size so it loads much faster in spite of your slow internet connection. So what are you waiting just try the YouTube feather beta version to feel the difference.


          Google Chome Tips :- How to block unwanted websites for few hours in Google chrome

          Google Chrome Icon
          In some places, it is very useful as well as necessary to block unwanted websites for some time due to some productivity reasons like in the offices,or any other working places. In this situations the Google chrome blocker extension can be very helpful in the working places to block the social networking websites like Facebook,twitter etc. During the working hours the unwanted websites can be blocked and they can be unblocked after the working hours. If you are using Google chrome browser, there is a extension which can block the unwanted websites as per the administrator choice.their are following steps :-

          1.Install the website blocker extension.

          2.Edit some settings and enter the URL of the website to be blocked.

          3.You can also type a optional message like the telling the users about this website is not available for this time interval.

          4.Also Hide the Website Blocker extension icon from the Google Chrome toolbar by Right clicking the this icon and selecting the “Hide button” option.

          5.Disable the link which is shown in the message given by the blocker which can guide the user how to unblock that website. Also disable the option to edit the setting from pop up window options.


          JOIN US AND GET LATEST UPDATES

          Get Updates via Email

          Blog Archive

           
          Home | About | Privacy | Proudly Powered By Blogger. | Blogger Template Design By Techcreak Go To Top